|
|
|
physical windows
Saturday, January 13 2007
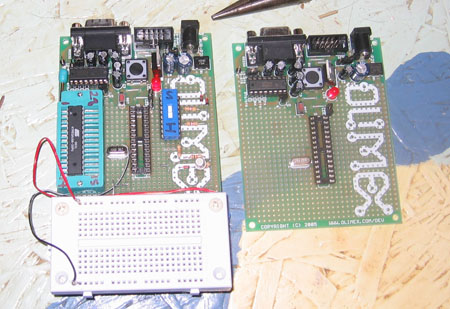
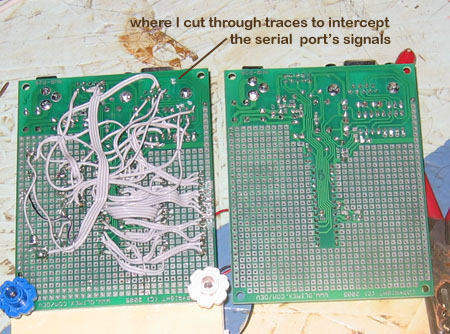
Atmel microcontrollers are cheap, flexible, and can easily be programmed to do a wide range of things. I don't know much about programming them directly in either assembly or C, but I can get them to do anything I want to in the Arduino integrated development environment. The problem with this environment is how basic it is from a hardware standpoint. The standard Arduino board holds at Atmega8 in a socket on a board with a timing crystal, some sockets for I/O add ons, basic power regulation, and a USB-to-serial interface. This is great for debugging code, but once you've programmed an Atmega8, chances are you'll want to pop it out and install it in a even more basic circuit. In my case I might just want to burn an Arduino bootloader on it and sell it online. Consequently, the sockets on my Arduino boards get a lot of wear and tear. I've actually taken to doing most of my bootloader burning on an Olimex AVR-P28 development board designed for 28 pin Atmel microcontrollers. A week or so ago I added a 28 pin zero insertion force socket to the board's empty real estate, wiring it in parallel with the Atmel socket. This made it much easier to program chips, but I still had the aggravation of swapping the serial cable between the ICSP programmer (used for burning bootloaders) and the serial port (used for doing Arduino stuff). This evening when it turned out that Gretchen and I wouldn't be going out on the town as originally planned I spent the evening adding a 6PDT switch to the Olimex board so I could leave the serial cable plugged into its serial port and change its functions with the flick of a switch. This switch is a small, cheap mechanical device with dual inline pins that I installed into a socket, since it has a rated lifetime of only 10,000 operations. With this switch I also had to duplicate all the electronics of the ICSP programmer (a AVR-PG1B containing one transistor, three diodes, and five resistors). I did so carefully, trying out the circuit first on a solderless breadboard that I'd also added to the Olimex development board. This marked the first time I made serious used a solderless breadboard to prototype electronics I ultimately intended to solder. Doing so gave me confidence with the electronics and didn't slow me down as much as I might have feared; it took about three hours to add the switch, cut the traces to the serial port, and solder in all the wires and electronics. (By the way, I found that I could substitute a 2N2222 NPN transistor for the BC846B specified for the AVR-PG1B.)
Over time I've discovered that it really doesn't matter how much space I have available — I only work in the space immediately around my computer. My nifty new Atmel prototyping board is there, as is my image scanner, my complete set of Sharpie markers, and (when I'm painting) tubes of acrylic paint. This is because, no matter what I happen to be working on, I need to consult Google or (if, I'm painting) some photograph I couldn't be bothered to print. At some point I want to design and build a desk that takes this reality into account, with all sorts of trays and tables pre-loaded with projects and devices that can be slid in and out as needed, right there beneath my monitors. They would be physical windows I drag into and out of my life as my interests change.

The front of my new Atmel prototyping board (left) and the way the Olimex board looked before I added things. Note the tiny 6PDT DIP switch.

The back of the my new Atmel prototyping board (left) and the way it looked before I added wires and such. Those wires are all pieces removed from an old floppy drive ribbon cable. Note the place where I cut the serial port's copper traces so I could reroute its wires to the 6DPT switch.

Gretchen covered with cats in the teevee room. She's kissing Marie, Wilma is in her left armpit, and Clarence is further down.
For linking purposes this article's URL is:
http://asecular.com/blog.php?070113 feedback
previous | next |


