|
|
|
lamp hell
Sunday, January 13 2019
My pattern for Sundays of late has been to work like a dog nearly from the moment I wake up until bedtime, which usually happens fairly early in the evening. Today was no different. It started with a couple firewood salvaging forays. The first of these took me (and the big Kobalt battery-powered chainsaw) to the base of the steep escarpment to the west of the Stick Trail a couple hundred feet south of the Chamomile, a little north of where I'd been collecting firewood on my previous six forays. There are a fair number of mid-sized fallen trees here, as well as a large fallen red oak. The problem with most of this wood is that it all contains a bit too much moisture. Still, I managed to find some new wood to cut up, and I kept cutting until the saw's battery was exhausted. By the early afternoon, I'd brought home two backpack loads of wood, which was enough to complete my firewood salvaging duties for this particular weekend. I should mention that conditions were sunny but very cold, though the cold matters is not much of a problem when one is carrying a backpack containing a hundred pounds of firewood.
Next I turned my attention to the kitchen chandelier project. The first task was to build a ceiling plate (techically a "canopy"), the little circular object tight against the ceiling from which the lamp hangs. In the past for my lamps, I've used stock metal canopies one can buy at a hardware store, though I've usually had to electroplate them with copper so they would visually match the copper parts of the lamp. For the kitchen lamp, Gretchen had wanted a simple canopy; she found the ones I'd used for my other lamps a bit too ornate. Thinking outside the box, I'd suggested using a small plate (the kind used for, say, holding a sandwich) and perhaps spray-painting it copper. When Gretchen found a simple white plate), it occured to me that I could just leave it be white and it would match the white ceramic sockets. To cover up the "Made in Italy" stamp on the bottom of the plate, I could cut out a circular copper disk and glue it to the center of the bottom of the plate, where it would serve as a transition from the copper lamp itself to the ceramic plate.
When I went about putting all of this into practice, I inevitably ran into problems. I didn't have (or couldn't find) a three inch hole saw with which to make the copper disk, so I was forced to cut out a disk from a scrap of copper sheet with a pair of scissors (this worked fairly well) and then rotate it on a drill to sand it into something close to perfection. But, even when flat, this disk didn't precisely match the contours in the center of the plate. So I mixed up a bunch of epoxy and tried seating the disk on that. But of course the epoxy didn't want to stick to the copper, so I was later forced to use a stick to smear superglue (or something similar) between the epoxy and the plate.
Another headache was that I'd made the two cables coming out of the top of the support pole too short. Each of them powered half the lamp through a series of internal junctions, and for some reason I'd only allowed a few inches where I should've left at least a foot. Lacking a better solution, I partially-disassembled the lamp and restrung those wires. With a lamp of this complexity, it's important to test periodically for shorts or breaks. The lamp had tested okay before restringing those two supply wires, but afterwards there was now a short between one of the hot wires and the copper of the lamp itself. That's not good! So then I had to take things apart, test for the problem, and fix (which I did with a piece of electrical tape).
The wiring went more easily than expected, though when I went to connect up the actual light sockets, I realized that regular half-inch copper pipe was slightly too small to accept the small part of the ass-end of the sockets I was using. Clearly I'd attached the sockets directly to a half-inch coupler. As the wiring was already done, I couldn't solder the couplers to the ends of all all the lamp stems. I had to use superglue, which (truth be known) works about as well as solder.
Eventually, though, it was time to attempt installation of the new chandelier above the island in the freshly-renovated kitchen. I'd used epoxy to attach a small brass nut sized to accept the 1/8 inch NPT nipple at the top of the lamp to the cross bar in the ceiling's electrical box. But when I tried to turn the lamp into that nut, the threads kept failing to engage. And then, to my dismay, the brass socket became unmoored from the crossbar. I tried gluing it with superglue and even securing the mass of detached epoxy with zip ties, all to no avail. So then I tried soldering a brass fitting with a threaded 1/8 inch NPT hole to the cross bar, and, though I got some solder to stick to that steel piece, there wasn't enough of it to secure a brass fitting.
I was exhausted and frazzled by the time Gretchen came home, and she could tell I was upset. Later I had her help with with another attempt at installing the lamp, but again the epoxy grave way and again the superglue failed to properly hold the epoxy (which, for whatever reason, had the consistency of leather). No matter what I did, I could not properly secure a brass fitting to the topside of the cross bar. Beyond that, though, I realized it was going to be impossible to make the parts all fit together even if I could get the lamp nipple to thread into the socket on the cross-bar. I'd measured things carefully such that if the nipple was tightened enough into the socket, it would push the canopy tight against the ceiling. But things seemed too loosey-goosey in practice for that to work. I realized I was going to have to make it so the canopy would slide up and down the central support rod and that I would have to find some way to secure it against that rod. But to make it slide up and down that rod, I was going to have to enlarge the hole I'd drilled through that Italian plate. I was having to use masonry bits to enlarge the hole, but they really didn't like cutting through the copper plate. As they did so, the plate got so hot that it delaminated from the underlying layer of epoxy, eventually forcing me to reglue it with superglue. But I got the hole enlarged, and then it was a fairly simple matter to install the lamp. To secure the canopy tight against the ceiling, I used a tiny hoseclamp. I thought it would be an ugly hack, but it was so small that it was almost invisible. When I put bulbs in five of the six sockets and turned on the circuit breaker, the chandelier came to life. Happily, Gretchen was very satisfied with the results.
Since I'd completed a thing I considered art, I celebrated by allowing myself to drink. I climbed into the basement bathtub and sucked down an entire Sierra Nevada Torpedo in only a couple of minutes.
I should mention that the troubles with the lamp weren't the only factors in my dysphoria. I'd also neglected to drink any caffeine, and by the time I'd realized it it was too late in the day to start.
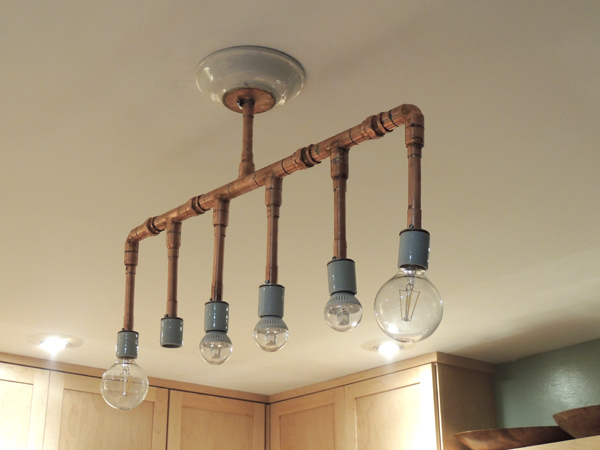
The chandelier as it was looking soon after I finished installing it tonight.
For linking purposes this article's URL is:
http://asecular.com/blog.php?190113 feedback
previous | next |